What is a Rube Goldberg Machine? A Rube Goldberg Machine is a machine that accomplishes a simple task using as many steps as possible. Our Rube Goldberg Machine Our Rube Goldberg Machine took on the theme of the Cars movie. We all contributed to building the machine even though we did different things to help. For example, I did the energy transfers and simple machines and helped build a great portion of the machine. Reflections During the project, I developed a better understanding and skill of using power tools and calculating the physics of different areas of physics. I learned a lot about teamwork and working with a team. I became more confident presenting and my one regret about this project was getting off track and time management. I feel I could personally contribute a little more but I think the overall work ethic of our group was pretty acceptable.
Steps
A car with the mass of 0.0354 kg, that was at rest with 0.31 J of potential energy rolls down a ramp of the height of 0.04 meters and the length of 0.102 meters. The ramp has a ideal mechanical advantage of 6.375, and the acceleration due to gravity of the ramp is 0.06 m/s^2.
The car of 0.0354 kg then transfers its kinetic energy that is 0.0105 J after rolling down the ramp to a 0.21 kg mass, with the potential energy of 1.6 J, making the mass to fall with the velocity of 0.9 m/s.
The 0.21 kg mass then falls into a container activating the double pulley system, which together has a ideal mechanical advantage of 2. The acceleration due to gravity of the mass is 0.2 m/s^2.
A toy person that is lifted because of the pulley pushes a lever up.
The car with the mass of 0.03133 kg, that was at rest on the lever, which has the potential energy of 0.206 J, starts to roll and goes down a ramp with the height of 0.08 meters and the length of 0.25 meters, which also has the ideal mechanical advantage of 3.125. It rolls down with the velocity of 0.75 m/s.
The car with the mass of 0.03133 kg then hits a piece of wood connected to a wheel and axle causing the wheel to turn around the axle at a speed of 1.13 m/s.
When the wheel turns, the piece of wood hits another car with the force of 0.16 N and the potential energy of 0. 21 J. The car has a mass of 0.06235 kg and had the potential energy of 0.21 J.
The car with the mass of 0.06235 kg, rolls down the ramp with the height of 0.14 meters, a length of 0.846 meters, and a ideal mechanical advantage of 6.04.
The nail acts as a wedge and pops the balloon by splitting the latex of the balloon.
A string attached to the balloon that was hold a mass of 0.415 kg is no longer attached causing the mass that had the potential energy of 0.89 J, to roll down a ramp with a kinetic energy of 0.005 J.
The mass hits the hammer with the force of 0.12 N.
The hammer hits a car.
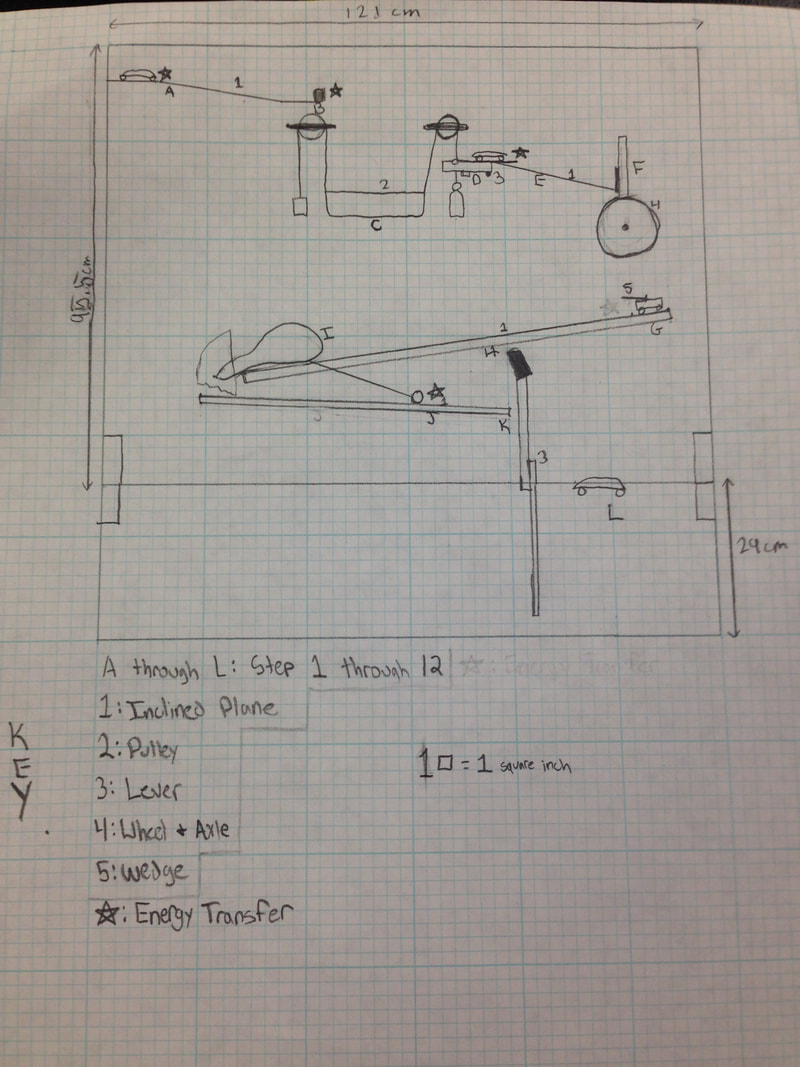
Blueprint
Construction Log Day 1 We took two piece of wood and screwed them together to make a platform. The top piece acted as the platform and the bottom piece as support for the platform. Support pieces are the pieces that are actually screwed or attached to the main board standing up, the main pieces are usually not drilled into to make sure we do not split the piece we truly need. We used the same technique for the ramp, a top piece for the ramp and a bottom piece as support. Two triangles, that each had a angle that was about 90 degrees, were screwed into the upright piece of wood and the bottom piece so our machine could stand up.
Day 2 A second platform was made by screwing a piece of wood to act as the platform, to a piece of wood to act as the support that would be the piece directly attached to the upright piece of wood. The first pulley was nailed into the board using long nails so the pulley would be able to come off the board. We could not complete the pulley system because we do not have the container that would be in between the two pulleys, meaning we could not determine how far the second pulley had to be from the first. A border made of popsicle sticks for the first ramp that was made on Day 1. The border was made by hot gluing the sticks to the side of the ramp and gluing them on top of each other to make the ramp higher.
Day 3 Since we have obtained a container, we were able to attach the second pulley to the board. String was attached to the container on both sides and strung one string to one pulley and strung the string on the opposite side to the second pulley. After adding object to the ends of each string to act as weights, we had finally completed our double pulley system. The lever for our next step was created by using a small wood pole as a fulcrum and put a piece of wood one top, we then screwed a piece of wood beneath the lever to keep it from moving in the wrong direction. To create a smooth transition from the lever, we glued popsicle sticks, half on the piece of wood and half off, this creates a path for a car to roll down when it needs to.
Day 4 The second ramp was made with one piece acting as the ramp, and two more pieces for support it and to be screwed into the board directly. This ramp was put under the lever to complete the transition from the lever to the ramp. We created a wheel and axle as our next step. A wood pole was used as our axle, behind the board we put pieces of wood to where the pole stuck out to make sure the pole did not move. Two CD’s acted as our wheel to turn around the axle. Between the two wheels, we screwed a small wooden pole that sticked out of the wheel to hit a car in our machine. The way we attached the stick to the CD’s, was by drilling small pilot holes into the CD’s and stick, then using very small screws we screwed them together. To complete the wheel and axle we put the pole through the holes of the CD’s.
Day 4 The second ramp was made with one piece acting as the ramp, and two more pieces for support it and to be screwed into the board directly. This ramp was put under the lever to complete the transition from the lever to the ramp. We created a wheel and axle as our next step. A wood pole was used as our axle, behind the board we put pieces of wood to where the pole stuck out to make sure the pole did not move. Two CD’s acted as our wheel to turn around the axle. Between the two wheels, we screwed a small wooden pole that sticked out of the wheel to hit a car in our machine. The way we attached the stick to the CD’s, was by drilling small pilot holes into the CD’s and stick, then using very small screws we screwed them together. To complete the wheel and axle we put the pole through the holes of the CD’s. Day 5 Today we attached a third ramp to the board, this time we just screwed the piece of directly to the board without any support pieces, because we believed the wood was thicker so it would not split. We glued a popsicle stick to near the top of the ramp to hold a car in place. Not much work could be done this day because we had to see what we were going to do with the amount of height we had left.
Day 6 The fourth ramp was attached to the board directly using screws and the placement of the balloon was determined. Now we have to wait until we got the funnel piece to attach the balloon to the board.
Day 7 Popsicle sticks were glued to the second ramp to assure that the car rolling down it would not fall off the ramp. A thin piece of wood was nailed to the piece of wood that is sticking out of the 2 CD’s to make sure the car would hit it and activate the wheel and axle.
Day 8 A funnel was obtained and we began cutting it to fit the machine. We cut the funnel very slightly to see what size would work best for the machine. The funnel seems to be a good size the way it is now.
Day 9 We cut the funnel a little bit to make a place for the balloon to stay in place. There was a piece of wood screwed into the boards to hold the hammer up, and a popsicle stick was glued on this piece of wood to help support the hammer. The fourth ramp was cut shorter to gain more height and length on the right side of our board. Popsicle sticks were glued onto the third and fourth ramps to act as borders, and 1 was glued directly onto the ramp diagonally to guide a car in the correct direction.